GS Mini / Armrest Bevel Project

Wednesday, February 12, 2014:

Well, I am finally beginning my GS Mini Style / Armrest Bevel Project! The cigar box ukulele kits are all put together, the student instructions are written, and the students will begin working on the kits on February 24th! So now I am free to begin my own personal project, the GS Mini guitar.

Today I traced the top and back shape onto tracing paper, along with the brace positions. Then I made a half-template onto some scrap hardboard I had on hand:


Next, I will make a mold.


IF YOU HADN'T HEARD ABOUT THIS PROJECT BEFORE TODAY, here's what I wrote about it a while back (before I had started on the previous Cigar Box Ukulele Kits project):


FINALLY...AN ARMREST BEVEL!!!

Once I complete the cigar box ukulele kits, I will have some time to work on my next personal project --- a guitar with an armrest bevel!! When I was at the recent Healdsburg Guitar Festival (August 2013), I saw lots of guitars with armrest bevels. I had seen them before, but all the methods I had seen people use to build those into their guitars looked too complicated or difficult to do. But, at this festival, I purchased a DVD of Kent Everett's method of building in his "transitional bevel," and it looked much less difficult than the other methods I had previously seen.

SO...I decided I needed to build a guitar, just to try out making an armrest bevel!

(Here's a YouTube video teaser for Kent Everett's DVD; it will give you some idea of what I want to do in this project.)

At first, I was going to do another Taylor Grand Concert style (but without a cutaway). But then, an Internet friend mentioned Taylor's GS Mini guitar, which I had heard of but had never actually seen. I went to my local Guitar Showcase to take a look at one ---- and I fell in love with the size and shape of this model! It's kind of in between a Taylor Big Baby guitar and their Grand Concert size; it's a 23.5" scale guitar. When I held it, it felt just right, especially since lately I've been plagued with a left shoulder rotator cuff problem, and holding and playing a regular scale guitar is still a bit difficult for me. Holding the GS Mini felt much more comfortable, and it sounded good, too!

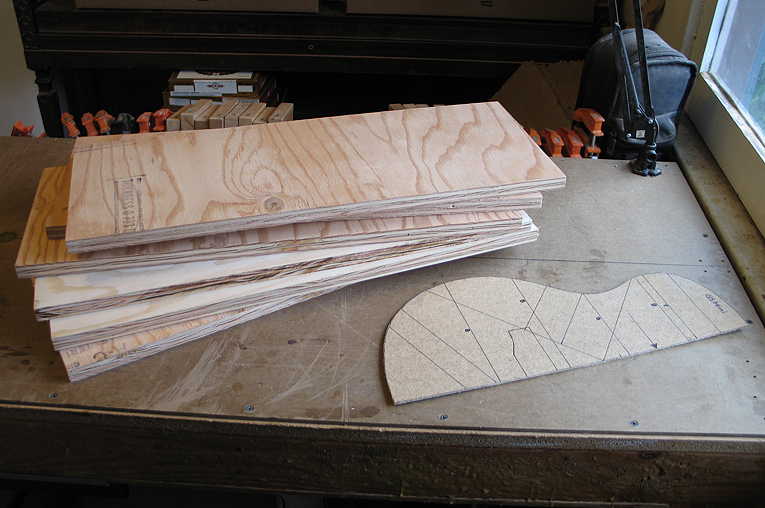
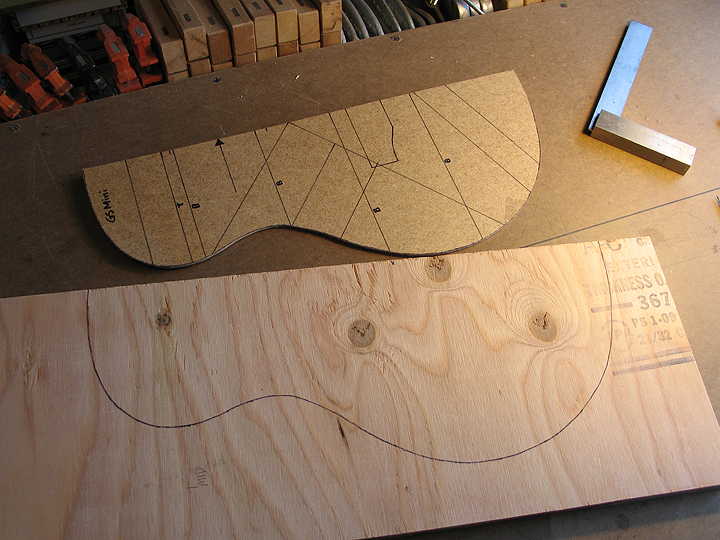
I looked online to see if I could find any blueprints or plans for this style guitar, and I found some plans from a luthier in Georgia. So, I ordered the plans, and, as soon as I can find some time, in the midst of these other projects, I will start on this project.

I am thinking I will use the Mayan walnut back and sides from LMI I had ordered back when I was building my first harp ukulele. For the top, I have ordered some Engelmann spruce. I am not sure yet what kind of binding I will use, or what I will use for the bevel veneer; I'll have to figure that out later, when I see how the walnut will look.


TABLE OF CONTENTS:

Return to AMATEUR LUTHIER HOME PAGE

  1. Making the Mold, Day 2
  2. Making Spreaders
  3. Ordering Supplies / Making a Bending Form
  4. Profiling the Sides 1
  5. Profiling the Sides 2 / Planning Next Steps
  6. Joining the Top & Back / Bracing the Back
  7. Carving the Back Braces / Cutting Top Braces / Bending the Sides, Part 1
  8. Bending the Sides, Part 2
  9. Beginning the Bevel / Neck & Tail Blocks
  10. "Driving the Bus" & Making & Gluing the Bevel Block
  11. The Bevel Block is Installed!!! / Gluing on the Kerfing/ "Driving the Bus" One Last Time / Trimming the Inside of the Bevel Block / Sanding the Inside
  12. Making the Soundport / Side Braces
  13. Working on the Fingerboard
  14. Making & Installing the Eccentric Rosette!!!
  15. Continuing on the Top
  16. Bracing the Top / Shaping the Braces / Making Clamping Cauls/ My Case Has Arrived
  17. Making the Top & Back Clamping Caul / Making the Label / Fitting & Gluing on the Back
  18. You Are Getting Hungry / Gluing on the Top / We Have A Soundbox!!! / VIDEO!! / Trimming the Overhang
  19. Routing the Binding/Purfling Ledges / Making the End Wedge
  20. Back & Top Binding
  21. Scraping the Bindings!!! / Filing the Bevel!!!
  22. Preparing & Gluing on the Veneer / Finishing the Bevel!!!
  23. Peghead Template / Heel Dowel / Carbon Fiber Reinforcement Rods / Threaded Inserts / Neck Profile Cut / Truss Rod Slot / Filler Strip
  24. Truss Rod Access/ Peghead Veneer / Nut / Trim Fingerboard End / Shape Peghead / Trim Neck Shaft / Gluing in the Truss Rod
  25. A Couple of Cool Tools / Making the Bridge
  26. Fitting the Neck/ Heelcap / Peghead Thicknessing & Tuner Holes / Gluing the Fingerboard to the Neck / Peghead Inlay
  27. Carving the Neck / VIDEO!!!
  28. Finish Sanding / Pore-Filling
  29. French-Polishing!!! / A Little Detour
  30. What's Left To Do???? / Final Polishing / Attaching the Neck / Gluing On The Bridge
  31. Getting Ready For The Final Set-Up!!!! / Cutting the Nut Slots
  32. Adjusting the Saddle Height / IT IS FINISHED! / VIDEOS!!!


Friday, February 14th, 2014:

Well, last night I bought some 3/4" fir plywood for my mold, so I would be all ready today to get a start on it. This morning, I first used my tablesaw to cut the plywood into six 24" by 9" boards. This mold will have 3 layers, so the mold will be 2-1/4" thick.


Next, I traced my template onto each of the six boards, positioning the template so that (1) it would miss as many of the knots as possible, and (2) the tail end of the template would be 2" from one end of the board.


Next, I used my bandsaw to cut about 1/16" or so outside the template's line. I did this on all six pieces.

My plan is to glue all 3 layers of each mold half together, lining up the straight outside edges of the mold halves. Then, once the mold halves are all glued up and dry, I will use my oscillating spindle sander to carefully sand the inside outline right up to the drawn lines, as smoothly as I can.

My other option would have been to make one master mold template and then use a pattern router bit in my router table to rout out the other 5 pieces to match the master template. I have done this before, on other molds....BUT....using the router still scares me a bit, so I decided to do it this other way.

If I'm careful in the sanding, it should work out fine. (And I'll feel safer.)


Here I have glued up one of the mold halves. I used a glue roller to apply Titebond glue to the top of the bottom layer, and laid the next layer on top of that glued layer, lining up the outside straight edges. I did the same to add the top layer. Once everything was all aligned, I clamped up the 3-layer sandwich.

Tomorrow I will take each mold half to the oscillating spindle sander and sand up to the outline marked on the top mold layer. Once that is done, I will trim up the outside edges of the mold.


I'm sure you have heard the saying, "You can never have too many clamps."

Well, apparently it's true.


Next Page