Planning:
|
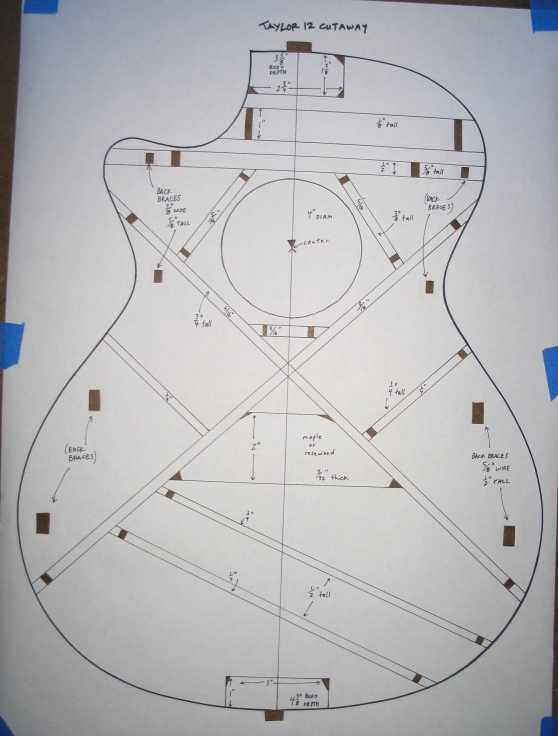
Monday, June 19th, 2006: To the right is the plan I spent today figuring out and drawing up. I first traced the outline of the guitar shape using the Taylor 12-size outside mold which I had bought from John Hall of Bluescreek Guitars. This was not a cutaway-model mold, so I then used a tracing of a Taylor Grand Concert (which the people at Guitar Showcase in San Jose kindly let me do) to draw the cutaway portion. All I had to go by was a tiny picture of the Grand Concert bracing (below) which Taylor supplies on their website. I enlarged it a bit, drew some gridlines over the picture, and came up with what you see to the right.
All the cutouts you see on the plan are what I will use to transfer the bracing positions to the top and back. The biggest cutouts are for transferring the back brace lines. All I do is mark, with a pencil, the outer edges of the cutouts made towards each end of the brace, onto the top or back. Then I connect the lines. I had never thought of doing it this way before — I used to punch little holes through the paper plan and into the wood, to mark the brace positions, but that left tiny holes in the wood, which I didn't particularly like. I learned of this method in one of the Official Luthiers Forum threads. (By the way....this is my second bracing plan drawing....in my first one, I had mistakenly — stupidly — drawn the cutaway on the wrong side of the plan! An Internet friend named Pat Hawley graciously informed me of my error — Thank you, Pat!!!) |
|