The Neck, Day 4 : The Great Allen Wrench Dilemma and the Peghead!!!
Thursday, July 29th, 2010: Let's start with another short video!!! I keep trying to get the video to faithfully convey to you what I'm actually hearing, but it never quite does. But, anyway, here's what it sounds like (kind of) now:
|
|
The very first thing I did this morning was to try to figure out a better way of accessing the single neck bolt, to tighten it or loosen it. With guitars or ukuleles with the soundhole in the usual center position, it's easy, as you have a direct line to the neck block and bolt. With ukuleles, it's a little bit more difficult, though, as the soundholes are much smaller than guitar soundholes, but it is do-able if you have a small hand as I do. Now, with this Kasha ukulele, I have the dual difficulties of a small soundhole (2-1/2" diameter) AND a soundhole placed to the side of the neckblock. The angle is a bit awkward, and, once you do get your hand in there, there's barely enough room for your hand to move around and maneuver an L-type allen wrench or screwdriver-type hex wrench. I could do it, but only with a lot of effort and a cramped hand. So, today, I tried to figure out a better way. It took me all morning!!! What I ended up doing is cutting an L-type allen wrench shorter, so its long arm was only 2 inches long (they don't seem to make them in that short a length!). Using a hacksaw, that took me a good half hour or so! Now that it was shorter, I could stick the long end into the bolt, and the short end would end up in line with the middle of the soundhole area. Now I needed something to make it easy to turn that short end of the allen wrench. I couldn't just extend that short end, because its angle with the soundhole was such that I wouldn't be able to move it very far back and forth. I figured I needed some sort of L-thingie, to extend the short end of the allen wrench to below the center of the soundhole, and then to make a 90-degree turn upward out of the soundhole. That way, I'd have room to turn the wrench arm back and forth.
|
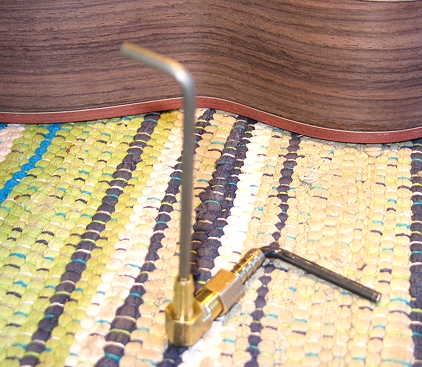
So, off to the hardware store I went, in search of some small L-thingie (how do you like my command of the technical terminology?) , of just the right size and length, into which I could epoxy the short end of the allen wrench. Here's what I came up with:
Here you can see the 2" long allen wrench arm goes into the bolt, and the short end of the wrench is epoxied into some sort of plumbing fitting that's just a tad larger than the 5/32" hex wrench. That fitting, screwed into some sort of plumbing L-thingie, extends about to the middle of the soundhole, and I have another allen wrench extending vertically, in the other end of the L-thingie. Since it's now in the middle of the soundhole, I have room to move it back and forth to tighten or loosen the bolt.
|
|
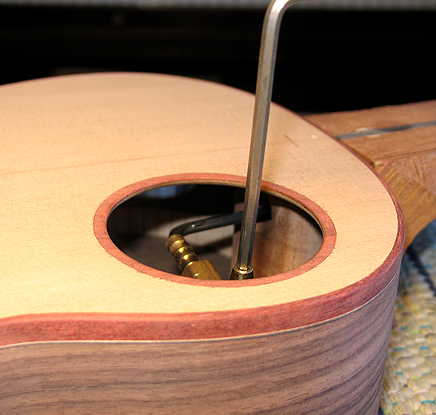
Here's another view, so you can see the L-thingie.
|
Here's how the thing is put together. I actually don't have the silver wrench epoxied into the fitting. I found when I first start working with the bolt, it's easier to get it started without that long wrench attached. Then, when I just need to do the final snugging up of the bolt, I use the long wrench for more leverage. It works! It's much better not having to do the whole thing with my hand cramped up inside the ukulele.
|
That wrench adventure took up my entire morning. Next it was time to work on the peghead shape. I decided to try to do something to mirror the weird Kasha bridge shape. So here's what I came up with:
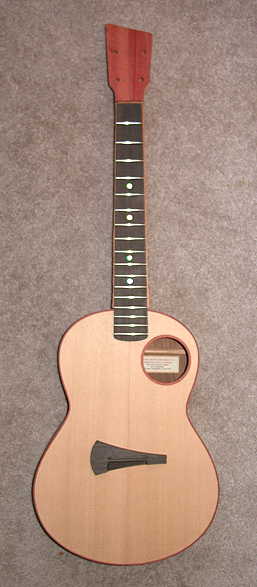
Nothing's attached. I just bolted on the neck (I haven't done any of the neck-angle setting yet — I can tell I have a lot to do there, as the neck is at a slight angle, and the area where the heel will contact the body is quite rounded). The fingerboard is not yet glued to the neck, of course (I've just laid it on top of the neck). Looks kind of neat, doesn't it?
|
||
I think I may quit for the day. My brain is fried, and I'm not really in the mood to attempt the neck setting yet. That takes me most of a day, and I need to be fresh and energized to do that, so I think I'll leave it for tomorrow. After I've set the neck, I can finally glue the fingerboard on and carve the neck!!! |
|
|
||
Previous Page |
Next Page |