|
|
Fri Nov 29 20:14:40 1996
To: Rick
Am thinking of making another Size 5, from scratch...but this one a bit fancier than my other one...with abalone purflings, etc. My brother, I know, likes mine, so I'll give him my first one when I get this one built...it's such a cozy size. I bought some mahogany for the neck...have looked at a few books for different ideas of how to do the neck joint...Benedetto (archtop guitar maker) does a simple dovetail, Sloane does a simple straight mortise & tenon joint (looks a LOT easier to cut by hand) with 2 angled dowels drilled in from the top after you slip the tenon in the body mortise, you sent me that bolt-on neck idea, and David Russell Young just glues his on flat. So far, the Sloane method looks like what I might try. It looks the easiest for me to handle. Don't know how much time I'll be able to spend on it during the school year, but I'm itching to get one going!!!!
Mon Jan 20 20:47:36 1997
To: Brian
FINALLY started my Size 5 (second one, this one totally from scratch) this weekend...gave final exams to my kids this past week, graded them pretty fast, then had a four-day weekend this week (MLK and a semester break day)....SO, decided it was about time to start this guitar!!! About two weeks ago, I had already cut the scarf joint for the neck peghead and had glued it. So, this weekend, I finally got my late father's old belt sander and router set up at my house, and started working on the guitar. Today, I cut the truss rod slot in the neck blank (1st time using a router in a router table -- pretty neat!), thinned the peghead, glued on the rosewood veneer to the peghead, cut a neck block and tail block out of the mahogany I have, glued up 4 stacked pieces of the neck mahogany for the heel, and cut a steel bar I'm using for the truss rod.
I'm working kind of "blind," because the other Size 5 I made was from a kit, and I had no written plans for it, except for the top bracing plan -- so I'm just guessing at the measurements of the sides, neck and tail blocks, etc., from looking at my already-made Size 5.....My first Size 5 was pretty plain - just a herringbone purfling, white plastic binding, plain spruce top. This one, I want to make really nice, for ME....I'm going to give my brother the first one (because I know he likes the small size)....I want to put abalone around the top and soundhole, and I also ordered koa binding from Luthier's Mercantile (but it hasn't come yet)....never done wood binding before......Also wondering how the bending of the rosewood will go...I did bend the mahogany on my last guitar I made last summer, but mahogany is a lot softer than rosewood....Ordered some rosewood and Master Grade Engelmann spruce from LMI, so it should look nice!!!
The neck is the only thing that is making me nervous...never built a neck from scratch before - always just ordered Martin's pre-made neck. I've pretty much decided to try doing the neck with a flat butt joint, with a dowel through the heel so there's no screwing into end grain, with 2 threaded brass inserts in the heel and bolts through the neck block. Rick had sent me a message someone had sent him a long time ago, about how she made her (I think it was a she) neck joints this way, so, after much changing-of-my-mind about what to do about the neck joint (from dovetail by hand, to mortise & tenon & bolts, to mortise & tenon and dowels), I decided to just go ahead and try the flat butt joint/bolt method. This guitar is so small & light that the neck joint doesn't probably matter a whole lot, so I decided to try this, as it seems it would be a lot easier to set the neck angle and neck line with a flat butt joint, than with that *^%$#@^&&* dovetail joint!!!! (By the way, how's the dovetail fitting on yours? You never sent me a message back on how that went....)
ANYWAY....will keep you posted on how it goes...I am glad to have FINALLY started on this....I was missing making guitars...it gets in your blood, I guess....I know, on this one, that I feel a lot more calm and able to think clearly and logically and slowly on it....I have a lot more confidence in doing it, and in having it come out really nicely, than I ever did before. I just LOVE making these guitars!!!!! If I could just make them, and come out even, money-wise, I'd be happy. The process just fascinates me....
Well, tomorrow I plan to glue the neck stacked block to the neck, trim the neck, maybe shape it, shape the peghead, and maybe get started on jointing and thinning down the top and back plates....How thin did you plane the top and back plates to???? (And how did you do it?) More later......
Sun Jan 26 22:27:32 1997
To: Brian
Spent part of this weekend finishing the neck for my Size 5. Yesterday I trimmed the sides of the neck, drew in & cut the headstock shape, and glued the stacked heel block (4 pieces of 3/4" mahogany) onto the end of the neck. Today I spent probably a total of 4-5 hours shaping the heel from the "cube" stacked heel block and then shaping the rest of the neck shaft, using a combination of belt sander (the curved end), sur-form files, flat and rounded files, sandpaper. What I found the hardest was getting the neck shaft as thin as I like it....it still feels a little thick on the outside edges. But I can still thin it down more when I do the final shaping after I glue the fingerboard on....What I need to do next is drill a hole down through the heel to put a dowel in, so the threaded inserts I put in the end of the neck will have something other than end grain to bite into (that was suggested by a few people who described using bolts instead of dovetail). I will wait on putting the inserts in until I build the body and then set the neck angle by sanding the butt end of the neck....so the neck will be put aside for a while....Next comes the top, back, and sides!!!! (Little by little...)
It's kind of fun working on this little "mini-size" guitar...as opposed to the big dreadnaught size. Everything's a bit more "dainty".
The rosewood I ordered from Stew-Mac, and it looks like I won't have to thin those...they're a little under 1/8" thick. The spruce I will have to thin, though, since I got it from LMI, and it looks like they don't send theirs out as thin as Stew-Mac does.
Well, it's off to school again tomorrow...sigh....I have a week winter break (Pres.days & a few more days thrown in) after Valentine's Day, so I'm sure I'll get a bunch done on the guitar then! Can't wait.
Mon Jan 27 20:17:22 1997
To: Brian
>So....exactly what is a "size 5" guitar? is it like a "parlor guitar" in size?
It's one of the earliest Martin styles...kind of like a 3/4-size guitar you see occasionally in stores. Body size is 16", lower bout 11", upper bout 8-1/2". A shorter scale, as if you put a capo on the 3rd fret, so you tune 1-1/2 steps up. What I did was just buy a regular slotted ebony dreadnaught fingerboard, saw it off at the 3rd fret, and then narrow down the width of the fingerboard so I still had my 1-11/16" width at the nut. I made my first one from a kit from the Kit Factory (Martin doesn't have it in a kit, as far as I know), and for this one, am just eyeballing the dimensions, as I have no paper plans except for the top bracing plan (slightly fewer braces). What is amazing about it is the big sound that comes out of it for such a little size...the rosewood, I'm sure, has a lot to do with it. The bass is a little bit dull, but the treble comes out really crisp...nice for fingerpicking. The little size makes it really nice to just curl up with. My first one was just plain...herringbone purfling, no abalone. This one I plan to put abalone around the soundhole and maybe even the top purfling, and put an inlay in the headstock. This one's for me...ever since I built my first one, I could tell my brother really liked it, so I plan to give the first one to him, and keep this one.
>What do you do? Do you just go outside or do you have a better method?
I primarily am able to work on the guitars only in summer, as it is too hard to do during the school year (no real time...because I tend to want to work on a step until I get it totally done...so little snatches of time here and there drive me crazy!!!!). So, that's what I've done. I spray outside because I have no shop, really, just a back little utility room. Unfortunately (I live in Calif.) the humidity was a problem at times, because it's been pretty hot in the summers the last few years...but once I discovered that blush is fairly easy to get rid of by just wiping it down with acetone or more lacquer thinner, I didn't worry about it. Also, I tended to spray in the earlier part of the morning (but not too early, because the cold made it not spray quite right either), when the humidity wasn't that bad yet. I'm still a novice about spraying.
>Do you use any stain on the neck? I bought some alcohol based stain from LMI and I mixed up the brown and stained the neck on the HD-28. BOY did it come out dark.
Yeah...my first couple of guitars' necks came out pretty dark, too...I used the alcohol analine dye powders. I learned to thin it a LOT and wipe it on more quickly, so it wouldn't turn out blotchy. I also found it a bit of a hassle if I wore away any of it when I was leveling the pore filler and sealer...it is really hard to get subsequent dye to match so it blended in and wasn't noticeable. I suppose that one thing that might work is using REALLY diluted color and letting it soak in deeper, in case you wear any of it away....
>Do you get into inlaying pearl or abaone? I just love that aspect of it. I took to it right away. Even my first efforts were very pleasing. I've aquired lots of tools for inlaying now. Two Dremel's, a dremel router base, Stew-Mac's new router base...lots of dentists bits...a little air driven turbo drill that a dental tech gave me....lots of cool stuff.
Yeah...I did the D41 model on my very first guitar (abalone on top) and was surprised at how easy it was and how nice it looked. I was surprised that the straight pieces worked around curves very easily, so you couldn't even tell they're all straight pieces (you break 1" pieces into two sometimes, when you have curves).
As for inlaying...my first three guitars I did straight block letters (KM, etc.), kind of fat letters, because I was totally new at cutting abalone. Cutting the inlay recess was a pain at first, because I wasn't very adept at using my Dremel's router base (the plastic holder was hard to adjust and make really secure). But I got better at it with practice. Now I too ordered the new Stew-Mac router base and am really anxious to use it...should be a lot more easy to use and a lot more precise.....On my last guitar (mahogany), I got really bold and did kind of a calligraphy style for my initials...a small k and a small m. Each letter took 3 separate tiny parts, since the letters go thick and thin, and I was sure they'd break if I tried to do them in one piece. Worked out fine, even the tiny recesses I had to rout out. I also did a 4-piece simple pine tree shape (my abalone pieces were only 1" tall, and my tree was about 3" tall, to go between the peg holes. Turned out really neat looking....kind of neat, too, because it looks both like just a design or arrow, but it is also symbolic of my name (Matsushita means bottom of the pine tree).
Also, what's neat in doing the inlays is how the epoxy mixed with rosewood dust nicely fixes a multitude of mistakes in cutting the recesses!!!! Unless you look really close, you can't tell how your inlay doesn't really fit perfectly! (Good for me.)
Do you have the circle cutter from Stew-Mac? (Maybe not, if you haven't done one from scratch...yet) It, too, is made to attach to the Dremel, and cuts circles and the soundhole channels just great. Oh, yeah...and the Waverly binding cutter attachment for the Dremel. That works just great...much more easy for me to handle (and less scary) than a router for cutting binding ledges. It comes with 4 different binding thicknesses (and you can just use tape to create intermediary thicknesses). It follows the surface you're cutting into, so you don't have to worry about shimming the router for arched surfaces. That, and the circle cutter, and probably now the new Dremel router base, have been the best purchases I've made.....and, as I'm sure you know, you can easily end up spending lots of money for specialty tools when making guitars!!! Oh, yeah....and the Waverly fret tang nipper (for when you bind fingerboards and need the fret to go past the fret slot, and thus must cut the tang on the ends). Very handy.
Well....keep the questions coming!!!!! It's fun to trade ideas. There's never one way to do anything, I'm finding out more and more....and some people come up with the most clever ways of doing things....a lot of improvising and ingenuity. Good for your brain.
Oh, yeah...tonight I just drilled a 15/32" hole through the heel of my neck, and glued the hardwood dowel in there (so the threaded inserts I plan to use have cross grain to bite into). It's kind of fun doing this all from scratch and having it actually come out okay! (It's a confidence-builder, for sure.)
Fri Jan 31 18:58:13 1997
To: Brian
>Next...please do me a fovor and outline what finishing procedure you have found to work best for you. Right from the start, like: "two wash coats of lacquer thinned 50/50 followed by....blah blah blah.
My 1st guitar, I had no idea what I was doing, had never used lacquer before, had no spray equipment. Cumpiano's book suggested brushing, so I tried that and I didn't like it at all. So then I found these little aerosol cannisters (Pre-Val or something like that) that you attach to a small jar, and you put the lacquer/thinner mixture in the jar, and spray it as if you were using a spray can. It was okay, but I hated pressing the button...after a while, your index finger gets REALLY tired and the spray sometimes sputters. But it had to do, since I had no spray equipment. Then I bought the little Miller spray (like airbrush) outfit Stew-Mac advertises, and that worked till it broke. It vibrates so much, and the plastic housing cracked. So, last summer when I did my mahogany guitar, I broke down and bought one of those little portable air compressors (PowerPal) with a spray gun -- I don't really need (or have the room for) a big compressor. I like it! What a difference in how fine and even a spray you can do, compared to all the other methods I had tried!
One of the main things, too, I had no concept of was the process of leveling, and how much you really DO have to level it down till there's NO shiny spots. My first guitar's finish was all blotchy (but to me at that time it looked great, as I had no idea how much better it COULD look). I got better and better on each one after that...my mahogany (the last one) turned out really nice. I learned it just takes lots and lots and lots of elbow grease to do the leveling far enough. I still feel like it's just trial and error...I guess at the number of coats to do...different books tell you all different things! I don't know if I'm putting on way more than I really need to or not!
Anyway, I kept a log on my 5th guitar (a D41 model), because I wanted to see how long it actually took me, how long each step took, what I did (right and wrong). Should be interesting for you to read. Don't necessarily go by my guidelines.....I don't necessarily still follow it (I can't remember if I did the coats the same last time or not). I'll send you the log. You can even see my goofs and accidents.
>What type of grain filler you use...paste or the new clear and how it's thinned....
I used just what I could find at Home Depot or somewhere...WoodKote Paste Wood Filler (natural)...another time I used some other brand, I forget what. I just used some oil stain I had lying around one time, and another time I used some artists oil paint in the tube, to color the paste filler. It's like a custardy consistency, so I don't think I thinned it at all...just mixed in stain until the color looked dark enough to match the rosewood or mahogany I was filling.
I have zero homework to do this weekend (just finished putting grades in the computer) so I'm really going to go to work on my little Size 5!!! A fellow teacher who teaches woodshop just showed me today the classical guitar he's been building for 10 years (he had started it in the school woodshop 10 years ago, then had put it aside for 9 years....) which he had just strung up today...it sounded really great! All from scratch...rosewood body, redwood top, mahogany neck, rosewood fingerboard, ebony bridge....He hasn't put the finish on it yet and it had some mistakes and little flaws, but it sounded really sweet and mellow! That's the neatest thing...how you can build something that actually comes out sounding so good! It's a neat feeling, huh????
Fri Jan 31 19:05:49 1997
To: Brian
Here's the time log (a database automatically tallied the times --- I just entered the start time, worked on the task, then when I was done, entered the end time, and typed in what I had just done). Hope it's enlightening (!!). This one, I was using the tiny Miller spray outfit, not the portable compressor. The numbers after the time are the amount of hours it took for each step. (I have summers off, so that's why I can spend huge chunks of time.) I think the total was 168 hours. This was a Martin kit, I think.
Sat Feb 08 11:36:13 1997
To: Brian
>Oh...what did you hole the body by, while you were spraying?
So far, I've done it the way Don Macrostie did it on the tape...I glued the neck on the body first, and then did the finishing, holding the body by the neck (sprayed body first, with neck covered with garbage bag, then covered body with bag and sprayed neck). I think I did it that way because I didn't know a way to hold the body w/out a neck, and also because I wanted to be sure to have the neck angle right and already glued to the body, instead of maybe having to do further neck adjusting later after the nice finish was on....On the tape I sent you, Richard Hoover said he holds the body with a block with a dovetail and a screw to just bite into the body slot....or something like that.
>Have you tried any of the clear grain filler from LMI ?
Nope...I've only used whatever pore filler I found locally (I forget which kind(s), natural color with stain to tint it.
>How goes the parlor guitar?
Got the top and back joined last weekend. Also epoxied in the truss rod (all I'm using for this little guitar is a square steel tube). I had intended originally to use koa binding for the back strip, to match the koa I intend to use for the body bindings....but the koa which I ordered over a month ago from Luthier's Mercantile hasn't come yet. So, since I had the back joined and am anxious to start on it, I went last weekend to a lumber place near me and bought a 36" strip of 1/4"-wide veneer with a nice simple pattern on it, and plan to use it instead. Veneer is really thin, so I'll probably glue two strips together, to make it a bit thicker.
Haven't done anything else yet...I did fax an order to Stewart MacDonald on Monday & they got the order to me within a couple of days! I ordered fretwire, Paua fingerboard dots, an ebony bridge (which I'll thin and narrow down for the parlor size), and one of those Paua abalone "Abalam" sheets (about 4" by 5") for the headstock initials and pine tree shape I plan to do. The "Abalam" looked really interesting, so even though it was really expensive ($50!!!), I decided to splurge and get it anyway....supposedly it's supposed to be less prone to chipping when you cut it, there'll be less waste, and I won't have to piece together 4 different sections to form my pine tree. Also, the colors are just really bright and a lot more brilliant than the regular abalone! Should be really pretty.
This weekend I'm going to thin down the soundboard to about 3/32" (the back and sides are already thin enough), put in that backstrip, cut out the back and top, and maybe start the bracing of the back. I have to wait on the top, because I don't have my curved abalone pieces for the soundhole yet (though I suppose I could try cutting curved pieces from the Abalam sheet), and I need to do the soundhole & soundhole inlays & purfling before I start to brace the top. I'll probably also drill the tuner holes in the headstock and maybe plan my headstock inlays, too.
I get next week (Feb.15-23) off (Pres.days and some other days thrown in), so I'm sure I'll get a lot done then....side bending!!! (I have Stew-Mac's electric bending rod...it wasn't too hard for the mahogany on my last guitar, but I suspect the rosewood will be a harder task!)
Sat Feb 22 17:22:36 1997
To: Rick, Brian
Had the week off (Pres.Days), so was finally able to make some headway in my Size 5! Despite a sinus throat & headache I've had for 2 weeks now and can't seem to shake, I still did quite a bit of work on it this week. It's Saturday today, and I just glued the back on the sides today. Am still waiting for LMI to send me the koa binding I ordered 1-2 months ago...
Bought a Casio Digital camera (QV100) about a month ago (It's an amazing little camera...color....even more amazing than the QuickCam!!!! It just blows my mind that I can keep 192 pictures in the camera's memory at once, never have to buy film, don't have to be hooked up to the computer to take the photos as I did with the QuickCam, can show the photos on a TV or computer, can edit the photos with Adobe PhotoDeluxe software!!!!). Anyway, I took some photos and am sending them to you (I have an inkjet color printer).
Oh, yeah...I decided to try the threaded insert (w/dowel through heel) and bolt method of attaching the neck....a flat butt joint, too...no mortise & tenon. I tried out the threaded insert method on some scrap wood and I think it'll work. The only thing now I'm nervous about is when it comes time to drill the holes for the inserts in the neck, after I set the neck angle. I'm afraid of messing up in the placement of the holes.....I do have a question, though, that nothing that I've read of using inserts talks about....do you know if you're supposed to glue in the threaded insert, or just screw it in dry? When I did it without glue, it seemed to be pretty tight.
Sun Feb 23 13:46:15 1997
To: Brian
>About the threaded insert...I would put it in dry...no glue needed. besides, most glues really don't grab metal all that well in my opinion. Dry should work fine.
That's what I figured...
>Maybe a trick I use to help you locate the holes: When ever I have to accurately locate the point where some "part A" is going to have to find "part B" in a blind situation, I rub white chalk or dressmakers pencil on "part A" and push the two parts together. The chalk leaves a perfect "fingerprint" of where I need to drill a hole or whatever. Maybe that will work for you.
Good idea! I was thinking of doing something like that....like an etching, right?
Well.....that's about it for now. Did you finish your 2nd guitar yet? I'm going to send this off to you now, and get to working on fitting the top to the sides (cutting the slots for the braces), now that I've glued the back on and removed my roping (that's how I clamped the back down to glue it).....Close to having a guitar body!!!!!
Sun Feb 23 14:17:33 1997
To: Rick
>I'm not sure about the threaded insert thingy .... I believe though that Taylor necks are attached just the way you describe.
Yeah...I saw in Taylor's Wood & Steel newsletter the issue with their explanation of their bolting system. That's one of the reasons I decided to go with this method.
>What I did was put a dowel vertically up through the heel, and then thread hanger bolts into it... the type you use to hold a toilet to the floor. It's a lag screw on one end, and threaded rod on the other, and you can buy different lengths.
I kept going back and forth between the hanger bolt method (you had sent me that lady's description to you about it a long time ago) and the threaded insert method. In fact, just before I finally decided what method to use, I went to Orchard Supply and got both sets of hardware...hanger bolts and threaded inserts w/bolts. Tried the threaded insert method on some scrap wood, and it felt pretty secure.....I did do the dowel through the heel, also.
>... then I made a sort of pencil type thing that just slipped through the holds in the neck block, and I used it to mark centers for the holes in the heel. Then I drill the holes *ALMOST* according to the marks, but in fact made the holes about 1/64" or so higher, so that the act of tightening the bolts when I attached the neck would also pull it down somewhat tightly. I hope all this makes sense!
Good idea! Briano suggested I could also rub some chalk on one part and press it against the other part, to transfer the locations. I also thought of making like an "rubbed etching" on paper held over the holes already drilled in the sides where the neck block meets it.
>Where did you find the threaded inserts?
Just got them at Orchard Supply...saw them at Home Depot, too. It doesn't seem hard to find them. 1/4-20 inside thread size, about 1/2" long.
>the main cross-brace that goes across the top, up under the fingerboard, somewhat blocks access to the adjusting nut. I should have cut slot or drilled a hole through the cross-brace, but was afraid that it would weaken it.
Actually, when you buy the top brace sets from Martin, that's how the fingerboard support brace comes...with a hole drilled right in the middle of the thick brace.
>If I could figure out a slick way of drilling a hole in the brace now, I'd do it in a second!
Could you use the Dremel to do it somehow? (Use the biggest drill bit a Dremel can hold, and then keep enlarging the hole?)
>Do you feel differently about this guitar than the others? There is something about starting with raw wood and turning out a working instrument that is immensely fulfilling.
Yeah....exactly! I like the fact that I feel a lot more confident about all aspects of it now....and I especially like the "problem-solving" aspect of doing a guitar from scratch. Great for my brain, and development of practicality and creativity....
I can't get over how my mahogany sounds...nice and loose and mellow, no matter when I pick it up....I must have gotten the action and neck shape just right...hope the 5 is as easy to play....I still take it into the bathroom to play...I love the acoustics there!
Well, going to send this off to you now...going to start fitting the top to the sides. I just took the roping off the back/side assembly (which I glued up yesterday) and need to notch the linings for the top braces. Then it's glue time for the top! And I'll have a cute little guitar body! (I love how solid it feels when you have the body all glued together.)
Mon Feb 24 21:33:27 1997
To: Brian, Rick
I now have an official body....minus binding (still waiting for LMI to send koa)!!! I love the clean look of the Englemann spruce! Also still waiting for the paua abalone strips for the top & soundhole....What's left to do???? Binding, abalone purfling, headstock inlay, fingerboard abalone inlay dots, neck angle setting & gluing in of fingerboard & bolting of neck, heel cap, finishing, bridge work (got a regular bridge, and will trim it down to the older narrow straight bridge style).....and a little more trimming of the neck. Have also decided to do the finishing before I glue on the neck....finish the neck & body separately. (On my other guitars, I had done the finishing after I glued the neck to the body, as Macrostie did on the tape.) Am getting pretty excited now!
Mon Feb 24 22:09:17 1997
To: Brian,Rick
Well....I'll keep you posted as the guitar progresses......still waiting on LMI to send me the binding....I don't know why it takes them so long....even after I called them a month ago, and they said it would be sent in a week.....sigh....I'm ready for the binding now, so now I'm getting a little bit frustrated with them.....
Thu Feb 27 16:16:01 1997
To: ebers
>Do keep in mind that wood swells when you apply glue, due to the water in the glue. Unlike plastic purfling and binding, for which you can cut the slots exactly, allow extra depth when using wood purfling. It is easier to take a scraper to the guitar side and feather the side into the bindking than try to scrape the binding down to a consistent thickness all around the top. If you've not done wood binding before, make a test piece with the same woods you'll be using and end grains in the same orientation to get some idea of how the binding will swell with the glue. Wood binding does look nice but it's *much* twitchier than plastic.
Thanks for the tips! I did not know that about the wood swelling....good idea to try a test piece first to see how much it might swell!
Thu Feb 27 16:22:12 1997
To: no1z
>I would recommend hot hide glue......cleans up great, sands flush, finishes great...cheap to use, but work quickly.....masking tape works great to hold everything in place....cut lots of strips first....bend the binding to fit first..ebony binding sounds way cool.....
Thanks for the reply! Is there any advantage to hide glue over Titebond? (Someone recommended I use Titebond....which I do use for almost everything else already, except a dovetail neck joint.) The masking tape method is what I use...I like it too.
Yeah....Photos I've seen of ebony binding (with a thin holly laminate on bottom) looked really, really rich and pretty....with the rosewood sides and Engelmann spruce top. One guitar (Jeff Traugott's) had ebony binding with a koa or orangish thin laminate on the bottom....that, against the rosewood, was REALLY rich looking.
Have you bent ebony before (I haven't)? Is it difficult to bend such binding without breaking it?
Thu Feb 27 17:04:25 1997
To: No1z
>tietbond is ok, but the goddam stuff shrinks for years, and after you finish the instrument it will pull finish into the binding and look like shit in a very few years....pardon my language, but it is appropriate in this instance...hide glue doesn't shrink, holds like hell, finishes great.....it just makes lousy canoe paddles........
Tell me about hide glue...I know nothing about it or how you use it....Do you know anything about the polyurethane glues (Gorilla glue)? Someone where I work was telling me about this glue today....
Fri Feb 28 21:47:45 1997
To: No1z
>how big is your shop?
No shop...just a tiny utility room at the back of my old small house. I have a 2-bedroom, so the 2nd bedroom has both my computer stuff and a table I have hinged to the wall for working on guitars.....
>how did you finish your D41?
At that point, I had nothing to spray with....so, at first I was going to try brushing the lacquer on as Cumpiano's book suggested, tried it a little, and didn't like doing it that way. So what I did with my first couple was buy those little spray cannisters of air you attach to a tiny jar, which you fill with your spraying material (Pre-val, or something like that). That was okay, but not the most smooth, consistent spray and it hurt my index finger a lot after a while (pressing the spray button). Later I bought Stew-Mac's little Miller airbrush spray outfit, until the plastic housing broke on it. On my last guitar (my 6th), I bought a portable air compressor (a PowerPal) and a regular quart spray gun....what a difference! A much finer, more controllable spray fan!!!! I have no spray booth, so had to just spray outside (summers are when I have the time to do guitars, so the slight humidity didn't help...). Am thinking of trying out LMI's water-based finish (I saw John Greven describe it at Healdsburg Guitar Makers' Festival last August) on this one I'm making now....he says he often just brushes it on with a foam brush.
>have any problems getting your neck set right?
Yuk...that was the most aggravating part on the guitars so far....especially on the first one, in which I had no real idea what the whole concept was of fitting the dovetail neck.....as I did consequent guitars, I knew more of what I was doing as I filed a little off here, a little off there, etc., so the results were better each time. My last guitar (the mahogany) turned out real nice, with a nice, low action...I don't know if it was just accident or whether I knew what I was doing or not....it still feels somewhat like guesswork to me. On the tiny Size 5 I am making now, I am trying a bolt-on approach, like Taylor's method....flat butt joint, threaded inserts in the heel, and bolts through the neckblock.....it looks like it will be a lot easier making the cheeks of the heel tight to the body, anyway....
>what are your favorite woods?
So far I've made 4 w/Indian rosewood and regular Sitka spruce. On the mahogany (my last guitar) I ordered Engelmann spruce, and really liked the clean, whiter look of it....and I liked the mellower, sweeter sound of the mahogany, much more than I had expected to.....in fact, it's the guitar I play the most now whenever I pick up my guitar....it also might be due to the fact that on that one I got the neck a lot slimmer and the action a lot better.....
Sat Mar 01 22:10:12 1997
To: No1z
It's Saturday, and I spent the day bending the ebony binding (it came via UPS yesterday from LMI -- I think they sent it fast because I had originally ordered curly koa back in December, they didn't have it, then forgot my new order of regular koa...so I had sent them a fax ordering the ebony instead....). It was kinda fun.....I broke the first piece of binding....I had read somewhere that it doesn't really give you warning on when it might break, and, sure enough, that was right!!!! The other pieces went fine, though, once I got the hang of it and figured out that I needed to use a very light touch and hold the binding very close to the bending iron.....After I did that, I cut and put in an ebony strip for the end wedge.
Started to rout the binding ledges with my Dremel attachment from Stew-Mac, but it appears I need new brushes for the Dremel....or a new cutter. Too late to get them now....will go tomorrow to my local OSH....am excited to get the binding on.....
I would love to have a band saw and a thickness planer......but a bit much for my budget at this time (also, I don't have much room here....). One thing I did do that was kinda fun and neat was make a jointer jig from a "Wood Notes" booklet plan....a jig that holds your block plane upside down in a little compartment, and that has a fence and guard....all from plywood and some wood pieces. It ended up working really well (much better than doing the jointing of the top and back halves by hand, with the plane or a level with sandpaper glued on....). I made it just before I joined the top and back halves, and was very pleased with the results!!!!
Wed Mar 05 17:54:38 1997
To: Brian
Got the ebony/holly binding and wood purflings glued in. Scraped the back and side bindings last night...I really like the contrast of the thin holly laminate at the bottom of the black ebony binding against the rosewood...should look even nicer when I have the finish put on. Am going to glue the abalone purfling in tonight, scrape it tomorrow. Ended up using Titebond...worked fine, but a bit harder to pull out the Teflon strip than with Duco.
Sat Mar 08 22:04:19 1997
To: Pat
Just heard from Mom that Andrew got into Santa Barbara! Congratulations, Andrew! Bet that's a relief and satisfaction to hear....that's where he really wanted to go, right?
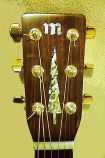
Been busy making my guitar....have the body made, the ebony binding and abalone put in on the top and around the soundhole. Just did the fingerboard (putting abalone dots in and frets in) today, and cut out and set the abalone design in the headstock. All I have left to do is bind the headstock, sand down the abalone on headstock, fit the neck angle, trim the neck to its final width, do the lacquering, glue the neck in (just gluing the fingerboard on the top, will attach neck this time with bolts), glue on the bridge, and string her up!!!! Should be at least another month to finish it all..... It's coming out nice.
Sat Mar 08 22:24:23 1997
To: Brian
>Again...REALLY nice work....send more photos!
Yeah....I like the camera. I plan to take some more soon. I've put the ebony binding and abalone purfling on the top, did the fingerboard dots (abalone) and frets today, did the abalone inlays (M and a pine tree) for the headstock. I think I might bind the headstock. Then it's time to set the neck angle, put in the threaded inserts in the neck heel, glue the fingerboard on the neck, and finish shaping the neck shaft and put the heel cap on (ebony). I plan to finish the neck and body separately (all other times I had glued the neck in the body first, then did the finishing on the whole guitar), to hopefully have cleaner joints (less finish buildup).
I just faxed LMI for a quart of that water-based finish....I might like to try that, if the brushing method (foam brush, Greven says) works easily. I recall that you said you had tried it.....but I never heard how it went. Please tell me how the water-based finish worked for you...does it come out just like lacquer? Did you brush it on?
Sun Mar 09 17:00:33 1997
To: Rick
I finally called LMI to ask about the binding...changed my order to ebony, and they sent it right away. Apparently they forgot about me and my order, but had big apologies, so I forgave them....
Got the ebony/holly binding and wood purflings glued in and scraped. I really like the contrast of the thin holly laminate at the bottom of the black ebony binding against the rosewood...should look even nicer when I have the finish put on. Am going to glue the abalone purfling in tonight, scrape it tomorrow. Ended up using Titebond...worked fine, but a bit harder to pull out the Teflon strip than with Duco.
Put the ebony binding and abalone purfling on the top, did the fingerboard dots (abalone) and frets yesterday, did the abalone inlays (M and a pine tree) for the headstock. I think I might bind the headstock. Then it's time to set the neck angle, put in the threaded inserts in the neck heel, glue the fingerboard on the neck, and finish shaping the neck shaft and put the heel cap on (ebony). I plan to finish the neck and body separately (all other times I had glued the neck in the body first, then did the finishing on the whole guitar), to hopefully have cleaner joints (less finish buildup).
I just faxed LMI for a quart of that water-based finish....I might like to try that, if the brushing method (foam brush, Greven says) works easily. Have you heard of anyone who's used it yet?
The photos show the guitar without the body really scraped or sanded down yet.....and the headstock inlay is not yet sanded down flush....that's why it looks so yucky at the moment. Hope you like these!
Mon Mar 10 20:54:08 1997
To: Brian,Rick
Cleaned up the headstock inlay. Looks a lot better now, though the true colors don't really show on the photo....Paua abalone has a lot more colors in it than the red or green I've used before....
Wed Mar 12 17:39:27 1997
To: Brian
>Don't know.....but the bottom line is...nice work!! How did you come to settle on the pine tree again?
Oh, I thought I had explained that before...maybe not..."Matsushita" means "bottom of the pine tree" (exciting, huh?) in Japanese, so I thought it'd be neat to have a pine tree design that also looked just like some kind of simple graphic design as well......long ago, I thought of trying to do an inlay of the KANJI (that's the Japanese characters) for "Matsushita" (it has 3 characters), but then I figured it would look too "busy" (besides being pretty difficult to cut out and rout). On my first few guitars, all I did were really blocky letters (M or KM)...whatever had the fewest curves and narrow parts...As I get more experience, I'm getting a little braver and a little more proficient. Cutting the abalone is not that hard....it's routing the cavity to fit the inlay you've cut that has proved the most difficult for me.....to make an exact fit. Luckily, the epoxy mixed w/rosewood dust filler covers up the discrepancies fairly well (unless you look really close), though matching the color of the filler to the surrounding rosewood isn't that easy, either....
Haven't worked on the guitar for about 3 days...too much schoolwork...maybe tonight....I have no schoolwork to do tonight....I need to trim down the standard dreadnought bridge I got, to the narrower straight style the 5 has (I bought the standard bridge because it already has the holes and saddle slot routed out and I didn't want to do that), so I might do that tonight. And I still need to file the fret ends and bevel them. And maybe put a narrow BW inlay on the headstock (not sure yet if I want to leave it plain or not).
I still want to know more details about how brushing on the water-base lacquer was....and how the result compares with regular lacquer!!!
Wed Mar 12 19:59:42 1997
To: Rick
Thanks for the compliments on the guitar photos...I'm getting excited now (a la Don Macrostie)....getting close to the end! Going to do a little work on it tonight...I bought a standard Martin bridge ('cause I didn't want to rout a saddle slot) and plan to just shape it down to the narrow straight size for the Size 5 style (or I might vary the shape a little, pretty it up a little). Oooh, I just thought of something...maybe I'll inlay some abalone into the bridge...what kind of simple design should I do?
I keep poring over any guitar books or catalogues I see, to look at designs, bindings/purfling designs, etc....so many pretty colors and designs! I just went to Guitar Center to get some strings I thought were an incredible sale (12 sets of Dean Markley's for $20), but it turned out to be electric guitar strings only (the ad didn't make it clear)....anyway, since I was there I went into their Acoustic room and saw the Taylor 912 with its thin white/red/white purfling under the side binding.....the red really made it look "rich" against the rosewood....I also like the rosewood ring they put on the soundhole edge...I wonder how they do that...just glue it onto the spruce edge?
Guitar Center is not my favorite store, but lately I've noticed they have a lot more of the high end guitars...now they're carrying Larrivees (I had never actually seen one closeup before), Breedloves (I don't really like their designs too much...kind of weird-looking), in addition to the Martins and Taylors. Every so often I go into the store to just look at the guitars (for ideas)...of course, Gryphon's in Palo Alto has just about anything....I finally saw a Jeff Traugott guitar there, which I had wanted to see ever since I saw his workshop on the StewMac tape...pretty, dainty-looking guitars, with a unique, simple koa band for the soundhole ring. I saw his guitars too at the Healdsburg festival last August and talked with him a little bit (I tend to be shy with these pros)...very friendly, smiley guy.
Tue Mar 18 17:35:50 1997
To: No1z
Hey....been slowly progressing on my little Size 5 guitar....got the binding (the ebony w/holly laminate) glued on (ended up using Titebond...worked fine, except a little harder than with Duco to remove the teflon strips that were holding the space for the abalone purfling)...looks good! (Can't wait to see what it looks like with the lacquer!) Fit the neck angle (I'm trying out just a flat butt joint with 2 threaded inserts in the heel & 2 bolts through the neck block), then glued the fingerboard to the neck. Last night I spent about 3-4 hours just finishing shaping the neck, to a slimness I like! Made a heel cap of leftover ebony from an old fingerboard. All I have left to do now is the final sanding & grain-raising, lightly dyeing the neck w/aniline dye, filling the pores, doing the lacquering (I'm figuring I'll be ready for that just when my spring vacation begins on Easter weekend - I teach, so I get that week off.), then finally putting on the neck and bridge and stringing it up! Can't wait to see how it sounds and ends up looking, since this one I did totally from scratch! I had built a Size 5 from a kit about 2 years ago, but it was much plainer (just herringbone & white binding) and my skills were much cruder then....but it still sounds good. I knew my brother always liked that little guitar, so I plan to give the old one to him when I'm done making this one, and keep this one for me! I had no real paper plans for this one....just the bracing plan....all the rest I did just by eyeballing the other Size 5.
Anyway....that's what I've been up to. I'm getting so close to the end of this one that each day I hope I don't have any, or much, schoolwork to grade, so I can come home right away from school and work on the guitar!
Fri Apr 04 21:15:02 1997
To: Brian, Rick
HEY...LONG TIME NO WRITE, RIGHT????? Well, finished the guitar today (except for some fine tuning yet to be done on the action). Here's a copy of some correspondence I have had over these last few weeks with another fellow guitar-maker (classicals, though) in Rhode Island. He was very interested in all the steps I took with the finishing (new LMI finish), so we kept in touch all along the way....thought I'd catch you up on my last few weeks! Also attached are some photos of the final guitar! I'll take some better digital ones in daylight (the true colors don't seem to come out under room light...). HOW HAVE YOU BEEN????
MON,3/24
I'm getting really antsy to start the finishing of my little Size 5!!! I put the aniline dye on the neck, the shellac washcoat on everything, then filled the pores with some latex filler tinted with some acrylic paint (I found I don't like the latex filler as much as the one you use with naphtha -- it dries too fast -- harder to sand off) (but I didn't want to wait as long for it to fully dry as I need to with the naphtha filler). Last night put on another thin coat of the shellac. I begin my Easter vacation (I teach) this Friday, so I plan to do the finishing Friday (or Thursday night and Friday, if I can't wait!). You can actually put on all 8-12 coats in 1 to 1-1/2 days, according to Greven. Then wait 5-7 days for it to fully cure and shrink before you buff it out. Will DEFINITELY let you know how it turns out! I am so jazzed that I can do this inside, with a foam brush (or nylon pad), with absolutely no fumes and water cleanup!
Actually, I don't just give away guitars to anyone. My first guitar, my brother bought (cost of materials only $500). I made my 2nd one (simple mahogany) as a birthday gift for my teenage nephew (a good excuse to build another guitar). I made another D41, planning to keep it for myself, but ended up giving it to my brother and took back the one he already had, because I felt bad that he had my first, inexpert attempt (it sounded good, but the saddle was too high and action a bit high and the finish was not good -- at that time I had no idea how to handle and level down lacquer sufficiently). So I gave that 1st D41 as a gift to a schoolteacher friend of mine who said she had had a guitar in college but had had it stolen (she was tickled, even though it was by no means a great guitar). My next guitars (Size 5, another D41, a mahogany) I kept for myself. That Size 5 I am going to give to my brother, because I would always see him playing it and liking its small size, whenever he would visit. (I still have it now, as I had to keep it to use as the model for the one I'm building -- and definitely keeping -- now.) My last guitar (that mahogany) was almost done from scratch --- no kit, but a preshaped neck and slotted fingerboard. I had seen a Taylor mahogany picture with tortoise-colored binding, and abalone around the soundhole, and gold tuners, tortoise-shell pickguard -- and I just loved the look. So I made one like that -- bent the sides myself and everything. My neck came out really nice and thin, and the action was the lowest I've ever been able to produce. It has a mellower sound than the rosewood D41, and for some reason, always sounds good! (My D41 seems to be harder to play on colder days.) I can actually easily barre an F chord on the mahogany!!!! (For me that's something -- I must have gotten the action just right this time!) Anyway, the guitar I pull out nearly always to play now is the mahogany rather than the rosewood!
Well, that's the story of my guitar-giving! Now I have to figure out another excuse to build another guitar...... if I could just break even in the money-end of this hobby, I'd be happy....
FRI, 3/28
Today is the first day of my Easter vacation, so I am doing the finishing. I put on 4 coats last night....I'm pretty much following Greven's suggestions (a very detailed instruction section in the new LMI catalogue): foam-brush on finish on back, wait 3-5 minutes, brush sides, hang for 10-15 minutes, lay on back and do the top, wait 3-5 minutes, then hang for 15-30 minutes. Lightly sand w/220, then recoat. He suggests doing "more vigorous sanding" between every other coat, starting with the 6th, and then completely leveling from the 2nd coat to the last, until the last coat. Right now I'm waiting to start the 7th coat....I'm not sure how many coats I'll end up doing. I'll see when I start sanding it down more level. One thing I did find out....the coats really DO have to be put on REALLY thin, or it does "craze" on you. But Greven suggests just laying on more coats on top of the crazing, and it will disappear.
It's now almost midnight here (Calif.) and I finished the 11th coat. I am going to wait (if I can stand it) until Wednesday (5 days) to wet-sand it and buff it. I just bought a Black & Decker polisher w/a 7" buffing pad, so I plan to use that. I would LOVE to have one of those buffing machines, but this will do.
I brushed the finish on...with a foam brush and also tried a paint pad (little 2" one). It varied on me how it went on...sometimes it foamed a lot and produced lots of tiny bubbles on the finish, sometimes not. The pad produced fewer bubbles, but it had the aggravating tendency to occasionally leave a few little tiny hairs in the finish, even after I had washed the pad out first as was suggested. But even if there were bubbles or hairs, I was able to sand/rub them out.
Now that the finishing is done...I guess I have no choice but to work on my yard (it needs a lot of weeding, etc....)....yuck!
SAT, 3/29
Well, maybe it's a good thing I have to wait....I have this backyard that I let go wild, and it's tall with weeds...I spent the whole day today (about 8 hours!) back there pulling the tall ones and weed-wacking the rest. Didn't finish -- looks like it'll take another day or two to finish and bag up the weeds and spray weed-killer. I don't spend much time in my backyard, so I tend to let it go...
Right now I am VERY tired...I know I'll be very stiff either tomorrow or the next day.
Well...more in four more days...(one down, 4 more to go...).
TUES, 4/1
I haven't rubbed it out yet....I had tremendous discipline about it! Turned out it was a good way to force me to do things I've been putting off, like weeding, spraying, raking, etc., the yard, mowing my front lawn, etc. I have been sore for three days now (though it was the worst the first day after I did the yard work). (Shows how much I do yard work.)
TOMORROW IS THE DAY!!!! I can't wait. I plan to wet sand with 1000-1200, then use rubbing compound and Finesse-It with the lambswool polisher. Can't wait to get the bridge on, glue the neck in, put the strings on, and see what it sounds like!
WED, 4/2
TODAY IS THE DAY. I have waited 5 days (since last Friday) PATIENTLY (drove me crazy) to do the final rubbing out of my little Size 5. I used LMI's new water-base finish ---- I really like it ---- I put on 4 coats last Thursday night, about 7 coats on Friday day (I have Easter break this week), then began my waiting. Forced me to do some long-overdue yardwork. I like the fast drying time, the lack of fumes or smell, the ability to do the finishing with a foam brush indoors no matter what the weather, the way it sands down easily. It does leave tiny bubbles with the brushing occasionally, but the sanding and leveling down fixes that. No blushing, etc. I LOVE the water clean-up.
Well, I'd better get off this computer, so I can finish my guitar!!!!! Don't you worry....You'll be one of the first to get a photo of it when it's done (doing the leveling/rubbing/buffing today, and gluing on the bridge & neck, too......GOING CRAZY WAITING!!!!!!!!!
THURS, 4/3
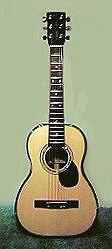
Well, I spent yesterday doing the leveling and rubbing down....and it came out beautifully! I wet-sanded with 600-1000-1200-1500-2000 grits, then used Finesse-It and Meguiar's #9 to polish it up. For the polishing, I used the power polisher at first, but then found that doing it by hand almost works as well. I really like the LMI water-base stuff....it looks as good as nitrocellulose lacquer, I think, and is easy to fix, too. In a few places where I had leveled down too far and had leveled away the finish, all I did was put on more of the LMI finish, wait a little while, then sanded it down again and polished it up again, and it came out good as new! I even put on the LMI finish on top of the buffed polish, to fix some scratches, and it was easy to fix, too. I'm attaching some photos, and you can see for yourself how reflective the finish came out (in one photo you can see the Boston Market drink cup pretty clearly!).
I also glued on the neck yesterday...I had made a simple butt joint neck with 2 bolts going through the neck block into 2 threaded inserts in the heel (put in through a dowel I had put into the heel, so they'd not go into end grain), so all I had to do was bolt the neck on and then glue only the fingerboard extension to the top. Doing the flat butt joint made setting the neck angle really easy. On all my other guitars, I had had to fit a dovetail (premade necks), and that was a pain. So I took this idea of the bolts and flat joint from various people I'd read had done it that way (I think Taylor does it that way), and I like it! I was really nervous about it, though, since it was totally new to me, and I wasn't sure about drilling the holes precisely. But it came out fine, and I also liked the fact that for once the cheeks of my heel fit nice and tight to the body, with no gaps. I found that hard to do with the dovetailed neck fitting.
Today, figured out where to put the bridge, and was all set to do the gluing, but found my 4" deep C-clamps wouldn't reach all the way to the bridge location (on the dreadnaught they do, but with this little scale guitar, the bridge is further away from the soundhole). So I spent (wasted) a few hours going to about 4 or 5 different stores I thought might carry the 6" C-clamps ---- no one does. So, I debated on whether or not to try to clamp the bridge by drilling 3 bridgepin holes and clamping the bridge with bolts, or using the 4" clamps I had. Well, I used the 4" clamps and just extended a piece of wood from the clamp to the bridge location...it worked out fine, in the end.
Dressed the frets, stuck on the pickguard, put in the end pin, put on the gold tuners. TOMORROW.....FINALLY....I'm going to string it up! Doing the nut and saddle work always seems to take me a long time, so I don't expect that to go quickly. Pray for no buzzes. Can't wait to see how it sounds! I'm really pleased with how it looks and how the finishing went!
FRI, 4/4
WELL, FINISHED THE GUITAR!!!! Did the nut and saddle (I finally had broken down and bought 3 nut files --- sure makes it a lot easier than using just an Exacto saw!!!) this morning and strung it up! Then took a break with a friend to go see "Sling Blade" and have an early dinner.
I still have some fine tuning of the nut and saddle and frets to do, because there are some buzzes (I think all I have to do is dress the frets again), but I can tell, once it loosens up, it's going to sound really nice. The Engelmann top seems to give it a crisp sound. It's a really nice size to hold -- you can just curl up with it on the sofa and play.
I really like how it turned out....made some of my required mistakes here and there (a binding channel cut a little too deep, making me have to improvise and make one side of the binding a bit wider; some finishing redo's).....but it really came out nice and rich-looking. I like the look (if not the work involved) of wood (instead of plastic) binding (and it's harder for me to scrape too much of it away, as it is easy to do with plastic)...I have ebony throughout the guitar (binding, end wedge, end pin, bridge, fingerboard. The ebony, mixed with the Paua abalone (headstock inlay, fingerboard dots and side dots, top purfling, and two tiny strips on the ends of my bridge), mixed with the thin holly side purfling strip and rosewood, all go together nicely. My digital photos don't really show the full colors and shine.
My finishing skills are improving, too. I get closer and closer to that "mirror-like" finish, each time. I spent more time leveling the finish with LOTS of different grits of wet-sanding, before I polished and buffed it. I think before, I went too soon to the polishing stage. The LMI finish was great! I don't think I'm going to ever go back to regular lacquer again!
I think I'm going to let the guitar sit for a few days, so it can get used to having the strings' tension and so the strings can stretch out and loosen up a bit (feels tight now), before I attempt doing the fixing of the buzzes. I don't know if that will make a difference (and it's more waiting time....sigh), but I think it might help.
OK, what shall I build next?????
Sat Apr 05 20:52:57 1997
To: Brian
>So....the LMI water based stuff really DOES work like they say...huh? Boy am I glad to hear THAT!! Do you think you'd of had even better results if you were able to spray it on? Do you think the long-term look will be as good as lacquer?
The LMI stuff is GREAT. I don't plan to use regular lacquer again. I am curious to see how this stuff is on the guitar over time....but, as far as I can tell right now, it looks just as good as lacquer.
Worked on the action a bit today....made a new saddle, a little bit higher in the bass end...that helped a lot....only one tiny buzz now. But even just overnight the guitar seemed to loosen up quite a bit, and the sound is becoming fuller. Amazing big sound for such a tiny body! I LOVE IT!!!!!!!!!!!!
Sat Apr 05 21:11:03 1997
To: Rick
>You will probably find the sound rather tight at first ...
Even overnight, the guitar loosened up quite a bit! I made a slightly higher saddle today, and it took care of most of the buzz. I have only a tiny little buzz on my low E and A strings now (actually, on this guitar, they're not E and A, but G and C, since it's tuned up 1-1/2 steps). I use a thumbpick and fingernails, so the bass comes out nice and crisp. Unfortunately, I cut my right hand fingernails just recently, so I need to wait a week for them to grow out to good playing length...but still the guitar sounds nice and crisp! And I am amazed at how big a sound comes out of that tiny body!!!!! I don't know what makes the sound come out of these little guitars (like the Taylor grand concerts and yours, too) -- is it the shape or the woods? I wonder if the Englemann makes a big difference? What I would like to learn is how the scalloping of the braces affects the sound.....I just scallop them by guessing...I don't have a particular plan or knowledge of what I'm doing with the scalloping....I guess I just did it till it looked good...
>Well, all your letters have got my gears a-grinding upstairs again. Last night I was looking at Bob Bendetto's book ... "Building An Arch-Top Guitar." That has always been my REAL dream -- to build an archtop. Maybe someday ... would be a whole different thing to have to carve the top and even moreso the maple back. Something to think about ....
Yeah...neat book. I bought it, too, even though I have no plans to build an archtop. I liked all the photos and the details Benedetto went into in his book. Even though it's about archtops, it still had lots of helpful ideas for building any guitar.
>Take care, and congratulations. YOu must be ecstatic.
Yeah...I LOVE IT!!!!!!
Sun Apr 13 10:26:00 1997
To: Brian
Yes...I LOVE this little guitar! I did make a few little mistakes here and there (binding channel cut a little too deep at one spot), but unless told, no one would be able to tell (unless he looked very closely and knew what to look for!). The bolt-on neck method worked great -- and it doesn't seem to be affecting the sound any. It made it a LOT easier to set the neck angles and to get the cheeks tight to the body, with no gaps (I had problems with this on the dovetail necks). Only place I glued the neck was under the fingerboard extension on the top.
Also...if you haven't yet done the finishing on your guitar, you should really seriously consider the LMI water-base. So far (time will tell) I can't tell the difference between it and lacquer. In fact, its faster curing time really makes a difference in how it feels when I play and hold it...I'm not afraid of having it be imprinted with contact with skin, etc. It seems harder. With lacquer it felt like it took a lot longer to harden enough to be confident about grabbing/touching it. The advantages are so great and numerous with this water-base stuff!
The sound of it is great. I put a gold strap button on it yesterday (made sure I hit the space between the two bolts when I figured out where to screw the strap button on). It has a nice, comfy feel to it. When I play my dreadnaught after playing the little one, the dreadnaught sure feels HUGE!!!!